
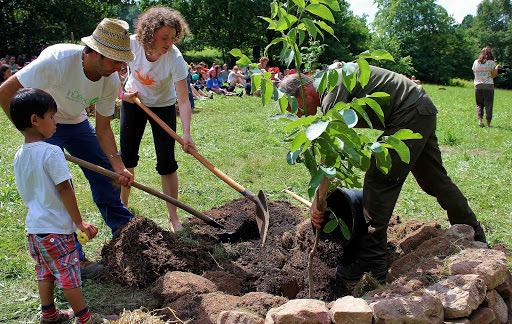
Planting a tree is a remarkable, rewarding, and fairly simple act. Here’s a guide to help you be successful, so that your efforts (and trees) will have the best chance of bearing fruit.
Steps to planting a tree:
Dig a hole
Prepare and amend the hole
Backfill the hole (no kidding!)
Plant your tree in the loosened soil
Tamp down soil
Mulch
Give your tree love and care
When to plant a tree?
“The best time to plant a tree was 20 years ago. The second best time is now.” – Chinese proverb
The best time to plant most trees is in late fall through winter (in areas where the ground isn’t frozen). Second best is early spring. In fact, you won’t even be able to get bare root trees later into the spring and summer. Either way, it’s ideal to plant before the tree breaks dormancy and begins to grow. Once a tree is no longer dormant, it will sustain some shock upon transplanting. This applies to both bare root and potted trees. Additionally, dormant trees need much less water, so planting in the fall or early spring means less urgent requirements for care. Even evergreen trees (those that don’t go dormant) grow more slowly during the colder seasons.
Dig a planting hole
No matter what kind of tree you’re planting, what kind of soil you’ve got, or what time of year it is, you’ll definitely need to dig a hole to plant a tree. Ideally, make the hole both wider and deeper than the actual root mass of the tree you’re planting. Generally speaking, a hole that’s about 3 feet in diameter and 16-20 inches deep will be great. If your tree has any exceptionally long roots sticking out, dig deeper to accommodate them rather than snaking them around a smaller hole.
If your soil has a high concentration of clay, you may notice that your shovel creates a smooth sidewall along the edge of the hole as you dig. Before planting your tree, you’ll want to break this up. Use either the edge of your shovel or a digging fork or hoe to “rough up” the smooth clay. If you leave a compacted ring, it may pose a barrier to roots that would otherwise venture beyond the hole.
Prepare your planting hole and amend the soil
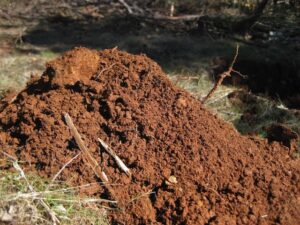
Pile up the soil that you remove from your hole onto a tarp, sheet, or large piece of cardboard. This makes it easier to mix and then return the soil to the hole. Now’s the time to add in your mineral amendments, if you’re going to. What you add can either be based on your soil test results, or you can use an “all purpose” approach.
“All purpose” approach to amending soil
A few cups of rock phosphate and a couple of handfuls of Azomite, SEA-90, and/or kelp meal. Phosphate is important for all fruiting plants, and rock phosphate is slow to release into the soil and won’t “burn” plants like too much nitrogen can. The other amendments contain small amounts of numerous beneficial micronutrients and aren’t likely to overdo anything at the handful level.
Whether you use this generalize formula, or tailor your amendments based on your particular soil, next you’ll mix them into the soil you removed from the hole. Do this either on the tarp, or after you’ve added it back into the hole. A hoe is a great tool for mixing amendments, but a shovel can work, too.
You might be tempted to add in lots of extra yummy things, like compost, manure, or high-nitrogen fertilizers. Some books and nurseries even recommend this to boost first year growth. We do not. That’s because if you make the soil in your planting hole extra rich in comparison to the surrounding natural soil, your tree’s roots will never want to leave. It’s like when you send a child off to college or life on their own: If you micromanage their survival, rather than letting them figure it out on their own, they may never fully “fledge” from your guidance and care. Another reason to leave the soil in your planting hole alone (apart from minerals) is that the vast majority of tree feeder roots will develop near the soil surface, not deep down. They can easily be fed by topdressing and mulch; more on this below.
Backfill your hole (no kidding!)
Once your hole is dug, fill it back in. No, this isn’t a joke. Since the hole is going to be quite a bit larger than your tree’s root mass, you’ll make a much smaller hole within your larger hole when it’s time to plant. If you’re planting a bare root tree, go ahead and fill in the hole entirely. If you’re working with a tree in a pot, you can leave a depression in the middle of your backfilled hole about the size of the pot.
Plant your tree in the loosened soil of the hole
It’s the moment you’ve been waiting for! Time to put your tree in the ground. As you do this, keep in mind the fact that the loosened soil in your hole will settle and compact somewhat after planting. Also, pay attention to air pockets in the soil and make sure you have good soil to root contact.
For bare-root trees
To plant a bare root tree, you’ll just need to loosen the already-loosened soil in your planting hole to the depth of its roots. For grafted trees (nearly all commercial fruit trees), plant the tree so that the graft union settles to 2 inches above the surface of the soil, which means set it a bit higher. In very cold climates, a bit lower can be beneficial so that the graft union is closer to the soil surface and protected from cold.
What’s a graft union, you might be wondering? It’s where the scion and rootstock come together; It’ll look like a lump or sudden change in diameter along the tree trunk, toward the bottom. If you plant a grafted tree too deep, the scion may sprout roots, effectively overriding any dwarfing or other characteristics of the chosen rootstock.
For potted trees
To plant a potted tree, first remove it from the pot. Ideally, it will come out easily. However, you may need to roll or squish the pot a bit to loosen the roots. In extreme cases, you may need to cut root bound trees out of plastic pots, or smash them out of heavier duty ones. If so, it will be a bittersweet moment of simultaneously liberating a wild thing from captivity and creating more trash for the landfill. Oh, life is full of contradictions!
Once the potted tree is free from its pot, take a look at the roots. If you notice any of them spiraling around in the shape of the pot, gently break them free. This is because if you leave them in a spiral, they’ll continue to grow like that and never reach out, hindering the tree’s ability to establish itself and grow well. When a tree is extremely pot bound, you may need to trim the roots. Yes, this will be a bit shocking for the tree, but, in the long run, it’s worth it.
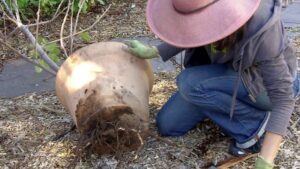 Image credit: Gardenerd.com
Using a shovel or your hands (depending on the size of the tree), dig a hole within your larger, backfilled hole. Don’t dig too deep, as the soil will settle and you want your tree to sit right at the soil level. Meaning, you want the soil from the pot to be just barely covered by the soil from the hole, rather than burying the tree deeper than it was in the pot.
Tamp down the soil to ensure good contact
After you’ve planted your tree, whether it was bare root or potted, use your fingers to tamp down the soil around it. With all five fingers outstretched, poke into the soil all around the tree. This will help remove any air pockets, improving soil to root contact. After poking around with your outstretched fingers, smooth over the soil surface and tamp it down with your flat hands. Ideally, your next step will be to mulch your tree, then water it in. If you can’t get to mulching right away, go ahead and water your tree without mulch. Use a watering can, wand, or other tool that gently sprinkles the soil surface, rather than a forceful hose that can disturb the loose soil.
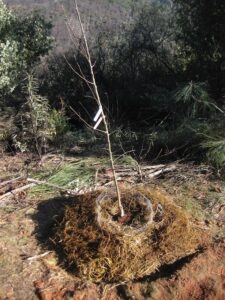
Mulch to protect and feed
Cover the soil around the base of your tree with a thick layer of mulch. Be careful to leave some space between the mulch and your tree’s trunk, to avoid bark rot. In a 2 inch ring right around the trunk, you can either leave the soil exposed or place small stones or gravel as a non moisture-holding mulch. If you dug the recommended 3ft diameter planting hole, cover this entire area with mulch (minus the small ring around the trunk). As your tree grows, so should the mulch ring around it. Generally speaking, the roots of a tree extend as far outward as its branches, so add mulch to cover all of the ground beneath the branches.
Since most of the feeder roots of a tree are near the soil surface (as we mentioned above), mulch plays an important role in feeding your tree. In a way, a thick covering of mulch is like a slow-burning compost pile. As it breaks down, all of the nutrients from your mulch will become available to the tree above, via the roots.
Welcome fungal friends!
Tree roots (along with those of many other plants) have a special relationship with fungi in the soil. It’s so special that it has a special name: mycorrhizal association (myco=fungus rhizo=root). Basically, they help each other out. Trees make sugar from the sunshine, through photosynthesis, which they share with fungi. In turn, fungi break down soil nutrients into the forms trees need, then carry them into tree roots. Everybody wins. Thanks to the beautiful elegance of innate cooperation in living things, mulch (especially when it’s made from wood chips and bits of tree branches) is broken down by fungi, among other organisms. So, a huge benefit of mulching is that it attracts friendly fungal collaborators right around the feeder roots, where your tree can benefit the most from their presence.
Tend and befriend your newly planted tree
Like all living things, trees need food, water, and love. Depending on your tree, some additional measures you might take to care for it include:
- Pruning
- Staking/supporting
- Protecting from pests
- Thinning fruit
- Protecting fruit from other fruit-eaters
- Harvesting
- Protecting from wind
- Spreading branches
The details of all these steps are beyond the scope of this post, but many dedicated and experienced orchardists have written excellent in-depth guides (see the resources below).
Whatever kind of tree you plant, you’ll be able to care for it best if you spend time observing it. Plus, spending time with your tree will feel nice; you can watch it grow and observe yourself growing and changing alongside.
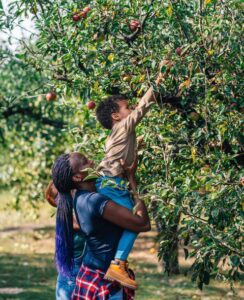 Image credit: Country Living Magazine
Further Resources
Books
The Holistic Orchard: Tree Fruits and Berries the Biological Way by Michael Phillips – Hands-down our favorite book on orchards, trees, and shrubs
Trees for Gardens, Orchards, and Permaculture by Martin Crawford – This will help you determine what kind of tree might be right for your situation
Mycorrhizal Planet: How Symbiotic Fungi Work with Roots to Support Plant Health and Build Soil Fertility by Michael Phillips – If you’re intrigued about these amazing relationships and how they can lead to healthier trees in your care
Growing Fruit With a Smile by Nikolay Kurdyumov – A fun and informative book filled with practical tips, both conventional and unconventional, about creating the ideal orchard for your particular situation.
Nurseries that sell trees
Useful Plants (local to Asheville area)
Seed Saver’s Exchange (apple trees only)
 On Facebook
 On Instagram