
If your green thumb is itching to sow seeds in the chilly winter months, then growing microgreens will likely be a fun and tasty solution for you. That’s because they’re easy to grow indoors at all times of year. These tiny treats are incredibly nutrient dense and are a sweet (and sometimes spicy) addition to many dishes. In this post, we show you how to grow microgreens, so you can get your indoor micro-garden started right away. To learn more about growing all kinds of full-sized vegetables, check out our Online Gardening School.
 Photo credit: Food Network
What are microgreens?
Microgreens are young, tender vegetables and herbs that are harvested as seedlings. Not to be confused with sprouts, microgreens are produced from seed that’s germinated and rooted in soil (or another growing medium). Microgreens are harvested for eating when they’re about two inches tall or after the first true leaf emerges (NC Cooperative Extension). Many plants produce delicious microgreens including broccoli, radish, cilantro, kale, mustard, and cabbage. Sunflowers are another hearty plant to experiment with growing and eating as shoots.
Microgreens not only provide unique textures, colors, and flavors, but they’re also packed with nutrition. According to a study in the Journal of Agricultural and Food Chemistry, the cotyledon – the first leaves to grow when a seed germinates – provide higher nutritional densities than the nutritional concentrations in mature vegetable and herb leaves. So, adding a handful of microgreens to your meals is both visually and physically satisfying!
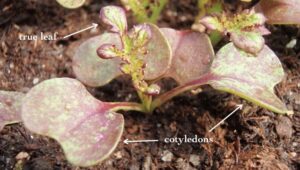 Photo credit: Wintergreens
Supplies for growing microgreens
Growing microgreens is a fairly simple process, and one that doesn’t require a ton of maintenance. At the very least, you’re going to need microgreens seeds, potting soil, and flat seed trays (one with drainage holes and two without). Grow lights can help support the growth of your microgreens and are a nice-to-have for this process.
Steps to growing microgreens
- Thoroughly clean and disinfect your flats. We recommend using a mild bleach solution to sanitize, which will help prevent mold on seedlings. Place a full seed tray beneath a tray with drainage holes to catch excess water.
- Moisten your potting soil and add to the seed tray until it’s about half full. Flatten out the soil but be sure not to make it too compact.
- Evenly distribute your seeds over the potting soil. Gently tamp down seeds so that they’re nice and cozy.
- Mist the entire tray of seeds enough to thoroughly moisten them. Cover the tray with another flat, a paper towel, or anything else that can block light.
- Place the tray in a warm spot (under grow lights, on a heat mat, or even just in a sunny spot by a window) and wait for germination. Be sure to mist the entire tray once or twice a day and keep covered.
- Once seeds have germinated, remove the cover and continue to water once or twice daily. Make sure that the tray is in a spot with plenty of light.
- Watch those babies grow
- Harvest and enjoy!
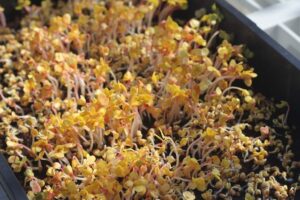 Radish microgreens after 4 days of growth
Photo credit: Tiny Green Farm
How to harvest microgreens
Depending on seed varieties and growing conditions, microgreens will be ready to harvest anywhere between 5 and 12 days after the initial sowing. You’ll need a clean, sharp pair of scissors or knife for this next step. To harvest, pinch a bunch of greens in one hand and cut with the other, making sure to harvest as much of the stem as possible without getting too much soil on the blades. It’s like giving the plants a haircut. Gently wash off excess soil from microgreens before eating – but be careful, these tender plants are delicate.
Whether you live in an apartment or out in the country, growing microgreens is an easy and accessible way to add more nutrients and flavor to your diet.
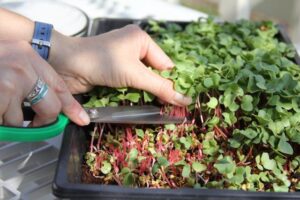 Harvesting microgreens
Photo credit: Tiny Green Farm
Microgreens growing kits
If you’re looking for an all-in-one solution for growing microgreens, then we suggest purchasing a microgreens growing kit. There are lots of starter kits on the market right now, including:
Back to the Roots Kit: These organic, zero-waste kits include seed packets, compostable grow trays, soil discs, and tray covers. They’re compact and take up very little space on your countertop or windowskill.
Hamama Microgreens Kit: Hamama microgreens are grown in water and require little light. Each of the starter kits include a reusable, recyclable grow tray and three Seed Quilts made from coconut fiber. Just add water to the microgreens growing tray, submerge a Seed Quilt in water, and come back in seven days to harvest.
Grow Kits from Local Farmers. Many farms are adding microgreens to their inventory as a year-round source of revenue. Some are even providing “Grow Your Own Kits”, like Erica Shanks from Bearded Birds Farm, a first generation farm here in WNC. It’s worth doing some research to see if you can support farms in your area who have similar offerings.
Sources for microgreens seeds
Many seed companies offer special collections for microgreens. It’s important that you choose seeds that are intended for microgreen growing. That’s because seeds of the same vegetables that are meant for garden growing may be coated and/or less rigorously tested for fungal pathogens.
 On Facebook
 On Instagram